De Motorised Drawing Arm (MDA) is een computer gestuurde beweegbare arm die digitale tekeningen voelbaar maakt op het TactiPad tekenbord. Deze tekeningen kunnen nadien verder manueel bewerkt worden. MDA combineert dus de accuraatheid van de software met de veelzijdigheid van het tekenen met de vrije hand.
MDA heeft een ingebouwde interface voor de netwerk configuratie en het gebruikersbeheer.
Afbeeldingen voor MDA kunnen gemaakt worden met TactileVIew of met tekenprogramma’s die SVG ondersteunen op iOS, Android en Windows
Verbinden met MDA:
- Gebruik een USB-kabel om MDA aan je PC te koppelen
- Verbind MDA aan het netwerk en het internet via WiFi of ethernet kabel
- Schets direct een afbeelding vanaf een ingeplugde USB-drive
- Maak direct verbinding met de MDA via de ingebouwde WiFi hotspot
Introduction
The motorised drawing arm (MDA) is a sophisticated add-on for the TactiPad drawing board. It opens up new use cases for the creation of tactile graphics in educational, professional and recreational settings.
When a design has been sketched by the MDA, the user can manually add to the drawing on the TactiPad, or have a second sketch added.
The general product lay out and features incorporated for the placement of the TactiPad, ensure a smooth user experience.
For operation under various circumstances the MDA has several connectivity options such as: USB, a WiFi hotspot or connecting to a (wireless-) local network.
Once a WiFi connection is established between a mobile phone, a tablet or a computer and the MDA, the built-in interface is accessible with a browser.
On the page Examples and Interactive an existing image can be selected for immediate sketching. More images can be created with the TactileView software or with one of the numerous third party programs.
The users of the MDA can also establish their community of designers to help out with the creation of personalised images. The (detailed) description provided by the users, is the input for the designers to work with.
Knowing all about How to operate and configure the MDA will increase the reward for its versatility and simplicity.
The functionality built on top of the technical specifications prove that the MDA/TactiPad/TactileView combination takes a unique position in the range of products for creating and exploring tactile graphics.
Sophisticated add-on for TactiPad
The overall understanding is that by manually adding to a raised line drawing, sketched by the MDA, visually impaired users will increase their engagement with tactile graphics, as well as increase their capability to understand and create tactile graphics themselves.
The MDA quickly and accurately creates raised line drawings with its motorised stylus on the TactiPad. Once an image has been sketched, more information can be added manually or by placing the TactiPad back on the MDA to sketch a next layer.
In some cases it’s necessary to have multiple TactiPads with the same image. This can be quite tedious to do by hand, but becomes easy to do with the MDA by repeating the last sketch.
The MDA makes use of the wide spread scalable vector graphics (SVG) file format. A number of SVG files are already stored on the MDA. Additional files can be uploaded or retrieved from an inserted USB-drive.
Examples of applications of the MDA
 Education, schoolwork and exams
A teacher creates a task in which a tactile diagram is involved. This can both serve as a means to provide information and as a template in which the exercise is made. By dividing the exercise into several consecutive steps, tactile graphics become easier to understand and create a dynamic interaction.
- Participate in the classroom by sketching (‘printing’) images from the smartboard or handheld devices on the TactiPad (or multiple TactiPads simultaneously).
- Create a map and add step-by-step topographic or geographic information.
- Study graphs, geometry, physics diagrams, read and process values, etc.
- Use the MDA as a document reader for images in schoolbooks.
 Fun and games
- By allowing you to manually add to a sketched image, a wide range of games and puzzles becomes accessible.
- Print simple designs from the TactileView catalog, such as animals and flowers, as a source for kids to have fun with discovering shapes and drawings.
- Print simple objects and draw a copy to learn the basics of drawing.
- Sketch a partly finished drawing and have it finalised.
- Produce fun drawings with games such as ‘Connect the dots’.
 Professional use
- Produce schemes for work flow, statistical information, graphs etc.
- Use it as an aid for communication with colleagues.
- Sketch the images in textbooks based on the MDA.
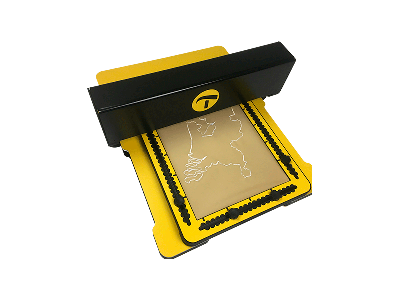
General product layout
The top layer of the MDA is made of the same material as the TactiPad and therefor has the same tactile properties and rich contrast colours: yellow and black.
To give it its sturdiness, aluminium plates form the foundation for the mechanical parts.
The unit is highly suitable to be used on a table/desk. The user can sit in front of the MDA even while it is sketching.
Two motors that move the arm forwards and backwards are housed underneath the bed of the MDA. The two motors that operate the stylus up and down and from left to right are housed inside the moving arm. The motors create little noise ensuring that the MDA can be used in settings where too much noise is undesirable. Caution is required when the arm is moving. Make sure that no objects or hands are obstructing the path of the arm.
Placement of the TactiPad
The MDA’s bed is just as wide as the TactiPad is in landscape position. The rounded front corners of the MDA line up with those of the TactiPad, making it easy to confirm, with touch, the correct placement of the TactiPad.
Lifting the TactiPad up is easy due to the indentations along the front, left and right side of the bed.
Six black anchors can be found on the bed. They are shaped in such a way that the TactiPad will naturally slide into one of two fixed positions. The four anchors nearest to the front panel hold the TactiPad in the horizontal (landscape) position, while all six are covered when the TactiPad is in its vertical (portrait) position. The front side of the MDA aligns with the TactiPad in both cases.
For correct placement of the TactiPad the hinge has to face backwards (landscape position) or to the left (portrait position) to ensure that the measurement indications surrounding the TactiPad and the internal measurements system of the MDA will match.
Even in the portrait position, the frame of the TactiPad can be opened to replace the drawing paper, assuming the arm has fully moved backwards.
To ensure a maximum of tactile recognisable details in the image, the MDA will, when necessary, rotate and/or scale an image to fit on the TactiPads A4 sized drawing area. To do so, built in sensors detect the position of the TactiPad.
For a quick identification of the image, a right up marker is always sketched in the upper right corner of the image.
Almost to the rear of the MDA a black ridge protrudes from the MDA’s bed. This is the dock for the receiver of the TactileView’s digital pen.
Connectivity options
The back panel holds, besides the on/off push button and the power plug, the connectors for Ethernet an USB Type A en B . Not visible is the WiFi transmitter that operates the wireless connection for the hotspot or connecting to a local network.
For a detailed description of the connectivity options see the respective manual sections.
Built-in interface
The software in the MDA operates as a website. The page is accessible from any browser. The default address is http://mda/.
The home page presents a general description of the device, details for the network configuration and the owner/managers data.
The setup page offers password protection, WiFi/network configuration, selection of user interface language and the choice of the measurement system (metric / Imperial (USA)).
The Manual page directs to the English manual sections.
On the Examples and Interactive pages pre-made images can be found. Just select one of them and click to start sketching.
On the Upload page the images from external sources are listed. Files can be deleted from this folder for storage management.
The USB-drive page allows the reading and sketching from a USB drive.
The MyImages page allows users to submit a design request. Also see the section on the Community of designers.
TactileView software
With the rich toolset, including the graph module and the map maker module of TactileView it is really easy to create tactile diagrams.
The designs can be sent via USB or over a local network connection to the MDA.
More information can be found in the TactileView manual.
Third party programs
For Windows and Mac based computers as well as for IOS and Android tablets and mobile phones numerous apps are available to convert existing images (JPG or PNG) to SVG or create new ones in this file format.
The files can be transferred to the MDA; send to the upload folder or to the auto-sketch folder for immediate sketching.
More information can be found in the respective manual sections.
How to operate and configure
The on/ off switch on the back panel is the only (push) button on the MDA.
All further operation of the MDA is controlled through the web interface.
For the many situations in which the MDA can contribute to the creation and exploration of tactile graphics, a carefully selected combination of the connectivity options and the desired application(s) for a single – or multi user setup requires consideration from the owner/manager to configure de MDA accordingly.
1. USB – the MDA is connected via USB cable to a computer.
The designs made with the TactileView software can be sketched directly on the MDA, similar to using a regular printer. However, no printer driver has to be installed.
Notes:
– TactileView offers no access to the MDA’s Web Interface.
– When connected via USB, wireless or wired access via hotspot or local network can be established for simultaneously accessing the MDA’s internal website/user interface from a browser.
2. Hotspot – direct Wifi connection.
The MDA can broadcast its Wifi network: mda-hotspot. Multiple mobile phones, tablets and computers with Wifi access can connect to this network. With a browser, the MDA internal website/user interface can be accessed.
The owner/manager can visit the Setup page of the internal website for advanced network configuration of a local network, wired and wireless.
Notes:
– A browser has no internet access anymore (no throughput).
– The functions in the internal website that rely on internet services are not available.
– TactileView designs can be sketched (via HTTP protocol) or via USB connection.
3. Local network – wireless or wired.
The MDA can be connected to a local network, either via Wifi (A) or via an ethernet cable (B); access via the hotspot to configure the Wifi network is required, while the wired connection will automatically be configured.
Notes:
– All pages/ functions of the user interface are available.
– With the local network connected to the internet, the MDA will have internet access as well, which is required for updates of the MDA software.
– The USB connection remains open.
Miscellaneous
When connected via hotspot or network, wired or wireless, SVG files created with third-party applications (Windows, Mac, IOS Android) can be sent to the MDA via a browser, via dedicated file transfer software, or by mounting the MDA file system directly to the PC/Mac (like a NAS server) to:
A. The upload folder; user controlled sketch process on the Upload page
B. The autosketch folder; start immediate sketching with no further user input
For developers: The MDA provides direct access from their application or website. Via the HTTP protocol files can be transferred.
Technical specifications
The Raspberry Pi hardware contains the built-in interface software, takes care of the connectivity and converts the SVG information into G-codes to drive the motors.
The required file format is scalable vector graphics (SVG) User interface languages: English, Dutch
Measurements system: Metric and Imperial (USA)
Dimensions / Weight / Power supply 110-240V 50-60Hz Four motors
Packaging
Included with drawing paper
Please note: The TactiPad drawing board is not included with the MDA
Community of designers
When a user of the MDA can’t find a suitable image or is unable to create one himself, a design request can be submitted in a few steps on the MyImages page.
A design request is a personal request and always associated with an e-mail address. In a single user environment the request comes from the owner/manager of the MDA. In a multi user setting the user has to provide his personal e-mail address. This is to guarantee the created design is delivered to the right MDA/user.
When submitting a design request the content that should appear on the tactile diagram should be described as detailed as possible to make sure the designer knows what he has to create.
An MDA user can make arrangements with his own designers. When submitting the request he can select to whom the request is sent (Thinkable does not offer design capacity).
All design requests are stored on a dedicated website for further processing.
The selected designers receive an e-mail notification when a request is waiting for them as well as instructions on what to do if they want to honour the request. Only one of the selected designers can accept the request, create the image and upload his design work. After completion of the request the user who submitted the request will receive e-mail notification and the design will appear in the MyImages list ready for sketching.